canvas 공튀기기
업데이트:
자바스크립트로 게임을 만들어 본 적이 없어서 공부도 할겸 이번 기회에 만들어보자! 해서 만들게 되었습니다. 공튀기기를 만들기로하고 간단히 어떤 원리로 공이 부딪히면 튀게 되는지만 확인하고 0부터 직접 코딩 해봅시다!
최신) 중간에 블록 생성하고 블록에도 충돌감지를 하도록 하는게 도저히 생각이 나질 않아 직접 코드를 따라치며 연필로 끄적이다보니 Interactive developer님이 만드신 코드가 이해가 갔습니다.. 너무 어렵..
1. canvas
canvas API는 javascrip와 HTML <canvas> 엘리먼트를 통해 그래픽을 그리기 위한 수단을 제공합니다. 애니메이션, 게임 그래픽, 데이터 시각화, 사진 조작 및 실시간 비디오 처리를 위해 사용됩니다.
canvas API는 주로 2D 그래픽에 중점을 두고 있습니다.
2. 공이 튀는 원리
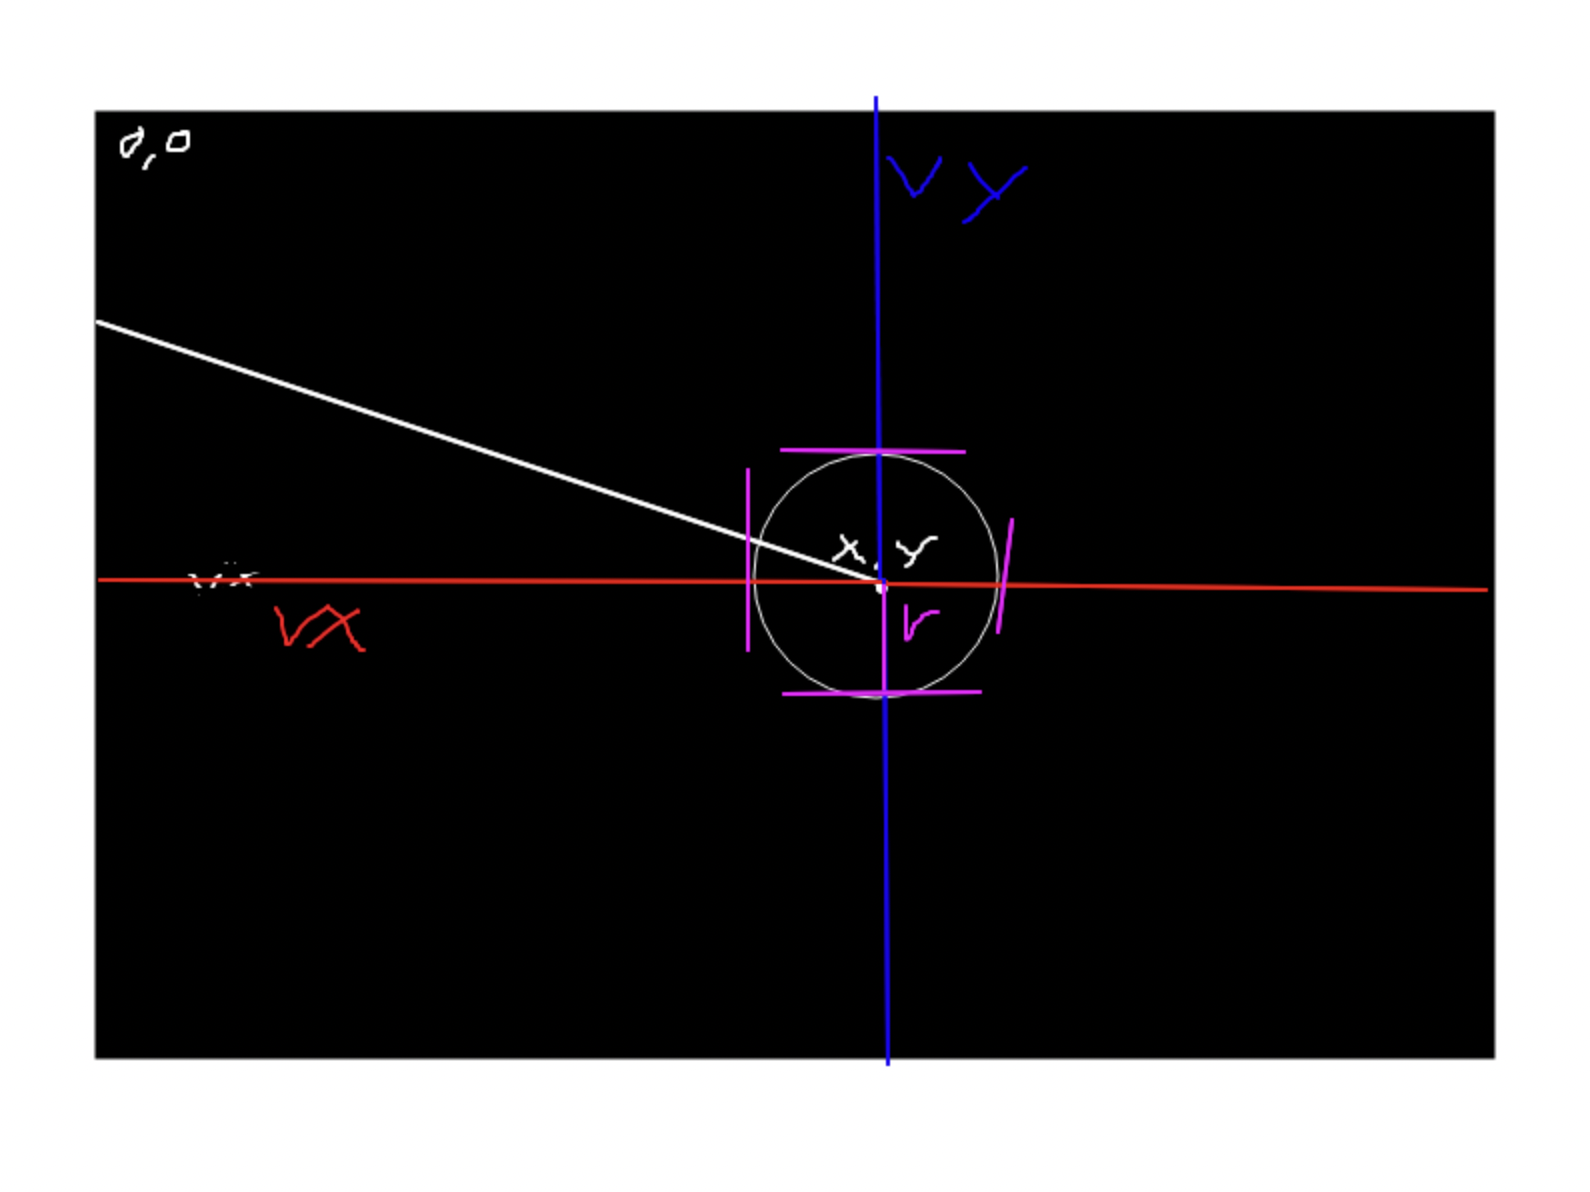
x,y: 공의 위치 값r: 공의 반지름vx ,vy: 공의 속도 ( x, y값에 +할 변수)minX, maxX: canvas width의 시작과 끝minY, maxY: canvas height의 시작과 끝
x,y 공의 중심점을 기준으로 vx,vy 변수로 더해가면서 canvas 영역에서 움직이도록 만듭니다.
minX, maxX, minY, maxY로 공이 충돌했을때를 판단해서 -1 을 곱해주면 공의 기존 방향을 반대로 보낼 수 있습니다.
3. 공튀기기 준비
우선 css, html, js 파일을 만들도록 하겠습니다.
3.1 main.css
* {
    outline: 0;
}
html {
    width  : 100%;
    height : 100%;
}

body {
    width            : 100%;
    height           : 100%;
    background-color: darkgray;
    overflow         : hidden;
}

canvas {
    width  : 100%;
    height : 100%;
}
3.2 index.html
<!doctype html>
<html lang="ko">
<head>
   <meta charset="UTF-8">
   <meta name="viewport" content="width=device-width, user-scalable=no, initial-scale=1.0, maximum-scale=1.0, minimum-scale=1.0">
   <meta http-equiv="X-UA-Compatible" content="ie=edge">
   <link rel="stylesheet" type="text/css" href="./css/reset.css">
   <link rel="stylesheet" type="text/css" href="./css/main.css">
   <title>ballBounce</title>
</head>
<body>
<canvas id="ballBounce"></canvas>
<script src="./js/app.js" type="module"></script>
</body>
</html>
3.3 app.js
class App {

}
window.onload = () => {
   new App();
};
4. 공튀기기 시작
4.1 app.js
class App {
  constructor() {
      this.canvas = document.getElementById('ballBounce');
      this.ctx = this.canvas.getContext('2d');

      this.stageWidth = document.body.clientWidth;
      this.stageHeight = document.body.clientHeight;

      this.canvas.width = this.stageWidth;
      this.canvas.height = this.stageHeight;

      window.requestAnimationFrame(this.animate)
  }
  animate = () => {
    window.requestAnimationFrame(this.animate);
  }
}
window.onload = () => {
   new App();
};
canvas객체를 가져오도록 합니다.- 그리고
canvas객체를 가져왔으니getContext()함수로 그리기 컨텍스트를 구합니다. body의 전체width와height를 가져옵니다.- 가져온
width,height로 canvas의width,height를 설정해줍니다. - 공을 움직이기 위해
window.requestAnimationFrame(this.animate)로 설정해주고animate()함수를 만들어주도록 합니다. - 이제
animate메서드는 최대 1ms(1/1000s)로 제한되며 1초에 60번을 동작하게 됩니다. - 그 다음은 실제로 공을 그리는 ball.js를 만들도록 하겠습니다.
4.2 ball.js
export class Ball {
  constructor( stageWidth, stageHeight, radius, speed ) {
    // 원의 반지름
    this.radius = radius;
    // x,y축으로 이동하는데 몇 씩 이동할 것인가 ( 공의 속도 )
    this.vx = speed;
    this.vy = speed;
    // 원의 크기
    const diameter = this.radius * 2;

    // draw 공의 시작지점 정하는 x,y 값
    this.x = ( Math.floor(Math.random() * ( stageWidth - ( diameter * 2 ) )) + diameter );
    this.y = ( Math.floor(Math.random() * ( stageHeight - ( diameter * 2 ) )) + diameter );
  }

  draw(ctx, stageWidth, stageHeight) {
    this.x += this.vx;
    this.y += this.vy;

    ctx.fillStyle = '#f5f5f5';

    this.bounce(stageWidth, stageHeight);

    ctx.beginPath();
    ctx.arc(this.x, this.y, this.radius, 0, 2 * Math.PI);
    ctx.fill();
  }

  bounce(stageWidth, stageheight) {
    this.minX = this.radius;
    this.minY = this.radius;
    this.maxX = stageWidth - this.radius;
    this.maxY = stageheight - this.radius;

    if(this.x <= this.minX || this.x >= this.maxX) {
      this.vx *= -1;
      this.x += this.vx;
    } else if(this.y <= this.minY || this.y >= this.maxY) {
      this.vy *= -1;
      this.y += this.vy;
    }
  }
}
- Ball 클래스에서 생성자로
stageWidth,stageheight,radius,speed의 매개변수를 받습니다. 볼의 충돌여부와 공을 만들고, 공의 속도를 조절하려면 필요한 값 - 지름을 구하는
diameter변수가 필요한 이유는 이후draw()함수에서 공의 시작점을 랜덤으로 설정해야 하는데 공의 중심점인x,y의 값이 화면 밖에서부터 시작하는 것을 방지하기 위해서 입니다. draw(ctx, stageWidth, stageHeight)draw함수는app.js에서 전달인자(argument)로ctx,stageWidth, stageheight보낸 값을 매개변수(parameter)로 받습니다.this.x,y에는 Ball 객체를 생성할 때 원의 위치를 랜덤으로 지정한x,y값이 들어있고 vx,vy를 더해감으로서 원이 움직이게 됩니다.
ctx.fillStyle: 원의 색을 지정합니다this.bounce(stageWidth, stageHeight)- 벽에 충돌하는 것을 판단할 함수입니다.
min은 당연히 원의 반지름보다 커야 원이 정상적으로 화면 안에서 튕기게 보입니다.max는 canvas의width이지만 마찬가지로 원이 정상적으로 화면 안에서 튕기게 보이려면 원의 반지름을 빼줘야합니다.vx,vy는 각각 원의 중심축인 x,y축에 더해지면서 공이 움직이도록 보이게합니다. 여기서 -1값을 곱셈하면 원래 진행하던(x,y 포함) 반대방향으로 공이 진행하게 됩니다.
5. 공튀기기 마무리
이제 마무리입니다! 앞서 app.js에 작성했던 것에서 실질적으로 ball을 움직이기 위해 export로 내보낸 Ball 객체를 불러와서 코딩하도록 하겠습니다.
5.1 app.js
import { Ball } from './ball.js';

class App {
  constructor() {
    this.canvas = document.getElementById('ballBounce');
    this.ctx = this.canvas.getContext('2d');

    this.stageWidth = document.body.clientWidth;
    this.stageHeight = document.body.clientHeight;

    this.canvas.width = this.stageWidth;
    this.canvas.height = this.stageHeight;

    this.ball = new Ball(this.stageWidth, this.stageHeight, 50, 10);

    window.requestAnimationFrame(this.animate)
  }

  animate = () => {
    window.requestAnimationFrame(this.animate);
    this.ctx.clearRect(0,0,this.stageWidth, this.stageHeight);
    this.ball.draw(this.ctx, this.stageWidth, this.stageHeight);
  }
}

window.onload = () => {
  new App();
};
import {Ball} from './ball.js';: ball.js에서 작성한 Ball 클래스를 import 합니다.this.ball = new Ball(..): 전달인자(argument)로 stageWidth,stageHeight,radius,speed 주고 Ball 객체를 생성합니다.animate()this.ctx.clearRect(): 기존에 그려진 canvas를 지우는 메서드입니다. draw()하기 전에 써줘야 합니다 순서중요!!
this.ball.draw(..): 전달인자(argument)로 ctx, stageWidth, stageHeight 주면 끝!!- 이제 공튀기는 걸 감상하면 됩니다!!!
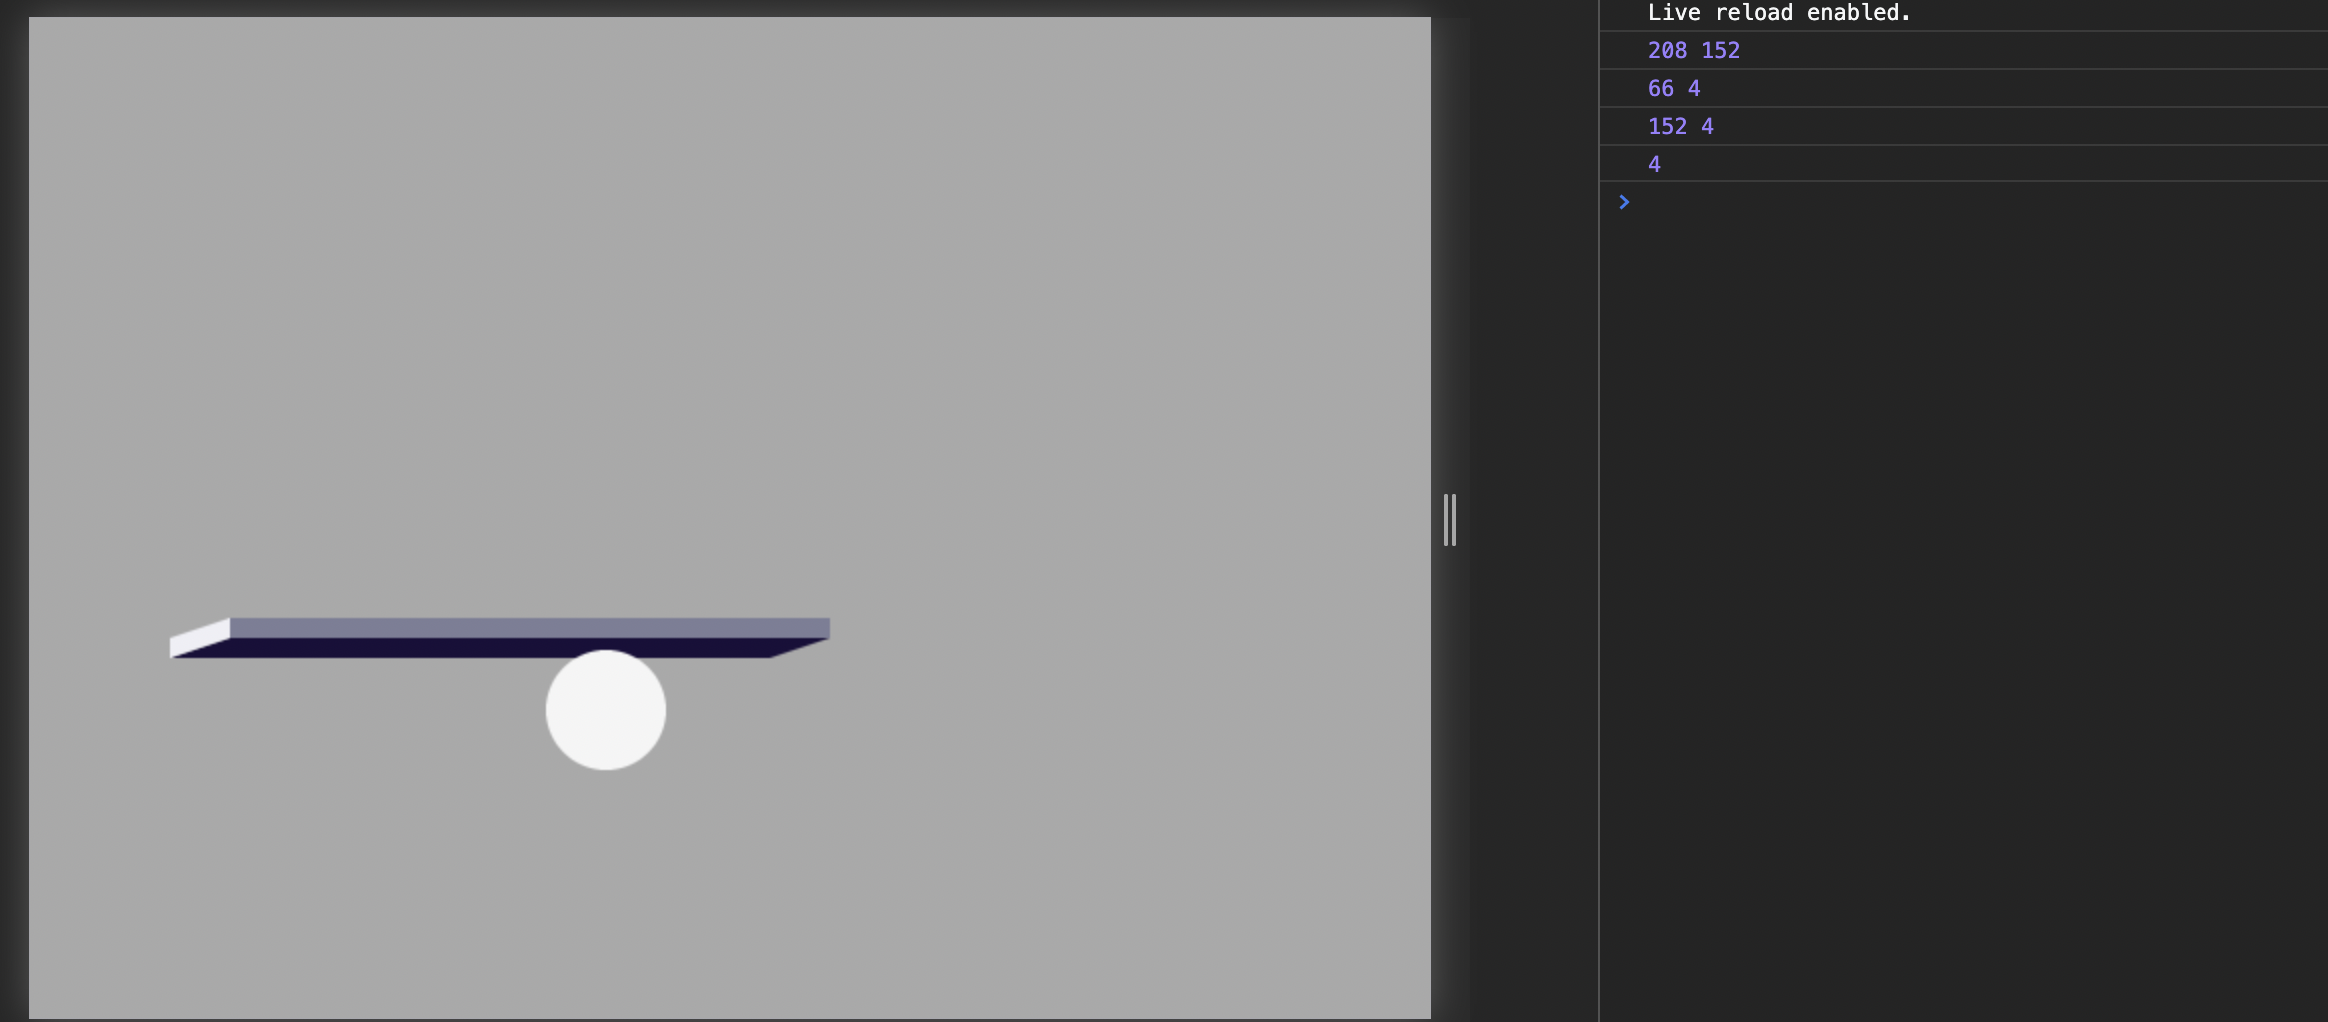
6. 공튀기기 - 중간에 벽돌 추가 해보기
canvas 중간에 벽돌을 생성하여 벽돌에도 충돌시 공을 튕기도록 만들어보자.
6.1 block.js
export class Block {
  constructor( width, height, x, y ) {
    this.width = width;
    this.height = height;
    this.x = x;
    this.y = y;
    this.maxX = this.width + x;
    this.maxY = this.height + y;
  }

  draw(ctx) {

    const xGap = 30;
    const yGap = 10;

    ctx.fillStyle = '#7c7e97';
    ctx.beginPath();
    ctx.rect(this.x, this.y, this.width, this.height);
    ctx.fill();

    ctx.fillStyle = '#190f3a';
    ctx.beginPath();
    ctx.moveTo(this.maxX, this.maxY);
    ctx.lineTo(this.maxX - xGap, this.maxY + yGap);
    ctx.lineTo(this.x - xGap, this.maxY + yGap);
    ctx.lineTo(this.x, this.y + yGap);
    ctx.fill();

    ctx.fillStyle = '#efeff5';
    ctx.beginPath();
    ctx.moveTo(this.x - xGap, this.y + yGap + yGap);
    ctx.lineTo(this.x - xGap, this.y + yGap);
    ctx.lineTo(this.x, this.y);
    ctx.lineTo(this.x,this.y + yGap);
    ctx.fill();
  }
}
- 벽돌의
width, height를 받아 크기를 설정하고 벽돌의 생성위치를 정할x, y값을 받아옵니다. - 벽돌의 끝 값을 가져올
maxX, maxY값을 구합니다. draw(ctx)xGap, yGap: 벽돌의 그림자를 어느정도로 설정할지 정하는 변수moveTo(x,y): 라인을 그릴 시작점을 정하고lineTo(x,y): 라인을 따라 이어 그립니다.- 정면, 아랫면, 옆면 총 3개의 면이 필요합니다. 간단하게 2d 직사각형으로 그리셔도 됩니다.
6.2 app.js
import {Ball} from './ball.js'
import {Block} from './block.js'
class App {
  constructor() {
    this.canvas = document.getElementById('ballBounce')
    this.ctx = this.canvas.getContext('2d');

    this.stageWidth = document.body.clientWidth;
    this.stageHeight = document.body.clientHeight;

    this.canvas.width = this.stageWidth;
    this.canvas.height = this.stageHeight;

    this.ball = new Ball(this.stageWidth,this.stageHeight, 30, 10);
    this.block = new Block(300,10, 100,300);
    window.requestAnimationFrame(this.animate)
  }

  animate = () => {
    window.requestAnimationFrame(this.animate);

    this.ctx.clearRect(0,0,this.stageWidth, this.stageHeight);

    this.block.draw(this.ctx);
    this.ball.draw(this.ctx, this.stageWidth,this.stageHeight, this.block);
  }
}

window.addEventListener('load', () => {
  new App();
});
- export한 Block 객체를 생성하고
animate()함수 안에this.block.draw(ctx)전달인자(argument)로ctx를 전달해서 벽돌을 canvas에 그립니다. this.ball.draw(..., this.block)함수에 직접 벽에 충돌하는 것을 계산하기 위해 전달인자로block객체를 보냅니다.
6.3 ball.js
export class Ball {
  constructor( stageWidth, stageHeight, radius, speed ) {
    ...
  }

  draw( ctx, stageWidth, stageHeight, block ) {

    this.x += this.vx;
    this.y += this.vy;

    ctx.fillStyle = '#f5f5f5';


    this.bounce(stageWidth, stageHeight);

    this.bounceBlock(block);

    ctx.beginPath();
    ctx.arc(this.x, this.y, this.radius, 0, 2 * Math.PI);
    ctx.fill();
  }

  bounce( stageWidth, stageHeight ) {
    ...
  }

  bounceBlock( block ) {
    const minX = block.x - this.radius;
    const maxX = block.maxX + this.radius;
    const minY = block.y - this.radius;
    const maxY = block.maxY + this.radius;

    if (this.x > minX && this.x < maxX && this.y > minY && this.y < maxY) {
      const x1 = Math.abs(minX - this.x);
      const x2 = Math.abs(this.x - maxX);
      const y1 = Math.abs(minY - this.y);
      const y2 = Math.abs(this.y - maxY);
      const min1 = Math.min(x1, x2);
      const min2 = Math.min(y1, y2);
      const min = Math.min(min1,min2);

      if(min === min1) {
        this.vx *= -1;
        this.x += this.vx;
      } else if(min === min2) {
        this.vy *= -1;
        this.y += this.vy;
      }
    }
  }
}
constructor과 bounce는 변경된 점이 없기 때문에 코드를 생략하겠습니다.
6.3.1 중간 벽돌에 충돌 감지하는 원리
- block의 width,height로 x,y,maxX,maxY 값을 가지고 있고, 공의 중심점인 x,y값이 block의 min 보다 크고 max 보다 작으면 충돌했다고 가정합니다
- 또한 공의 충돌이 벽의 왼쪽인지 오른쪽인지 위인지 아래인지 확인하려면 현재 공의 x,y값을 min값과 max값을 절대값으로 구하고 두 변수를 비교해서 수가 적은 쪽이 해당 하는 방향에 더 가까운걸로 판단합니다.
- 마지막으로
min은 좌표의 옆면인지 위아래면인지 확인하는 변수입니다. 마찬가지로 결국 block에 가장 근접한 값이 해당 면이 됩니다.
댓글남기기