자바스크립트로 할 일 목록 만들어보기
업데이트:
1. To Do List
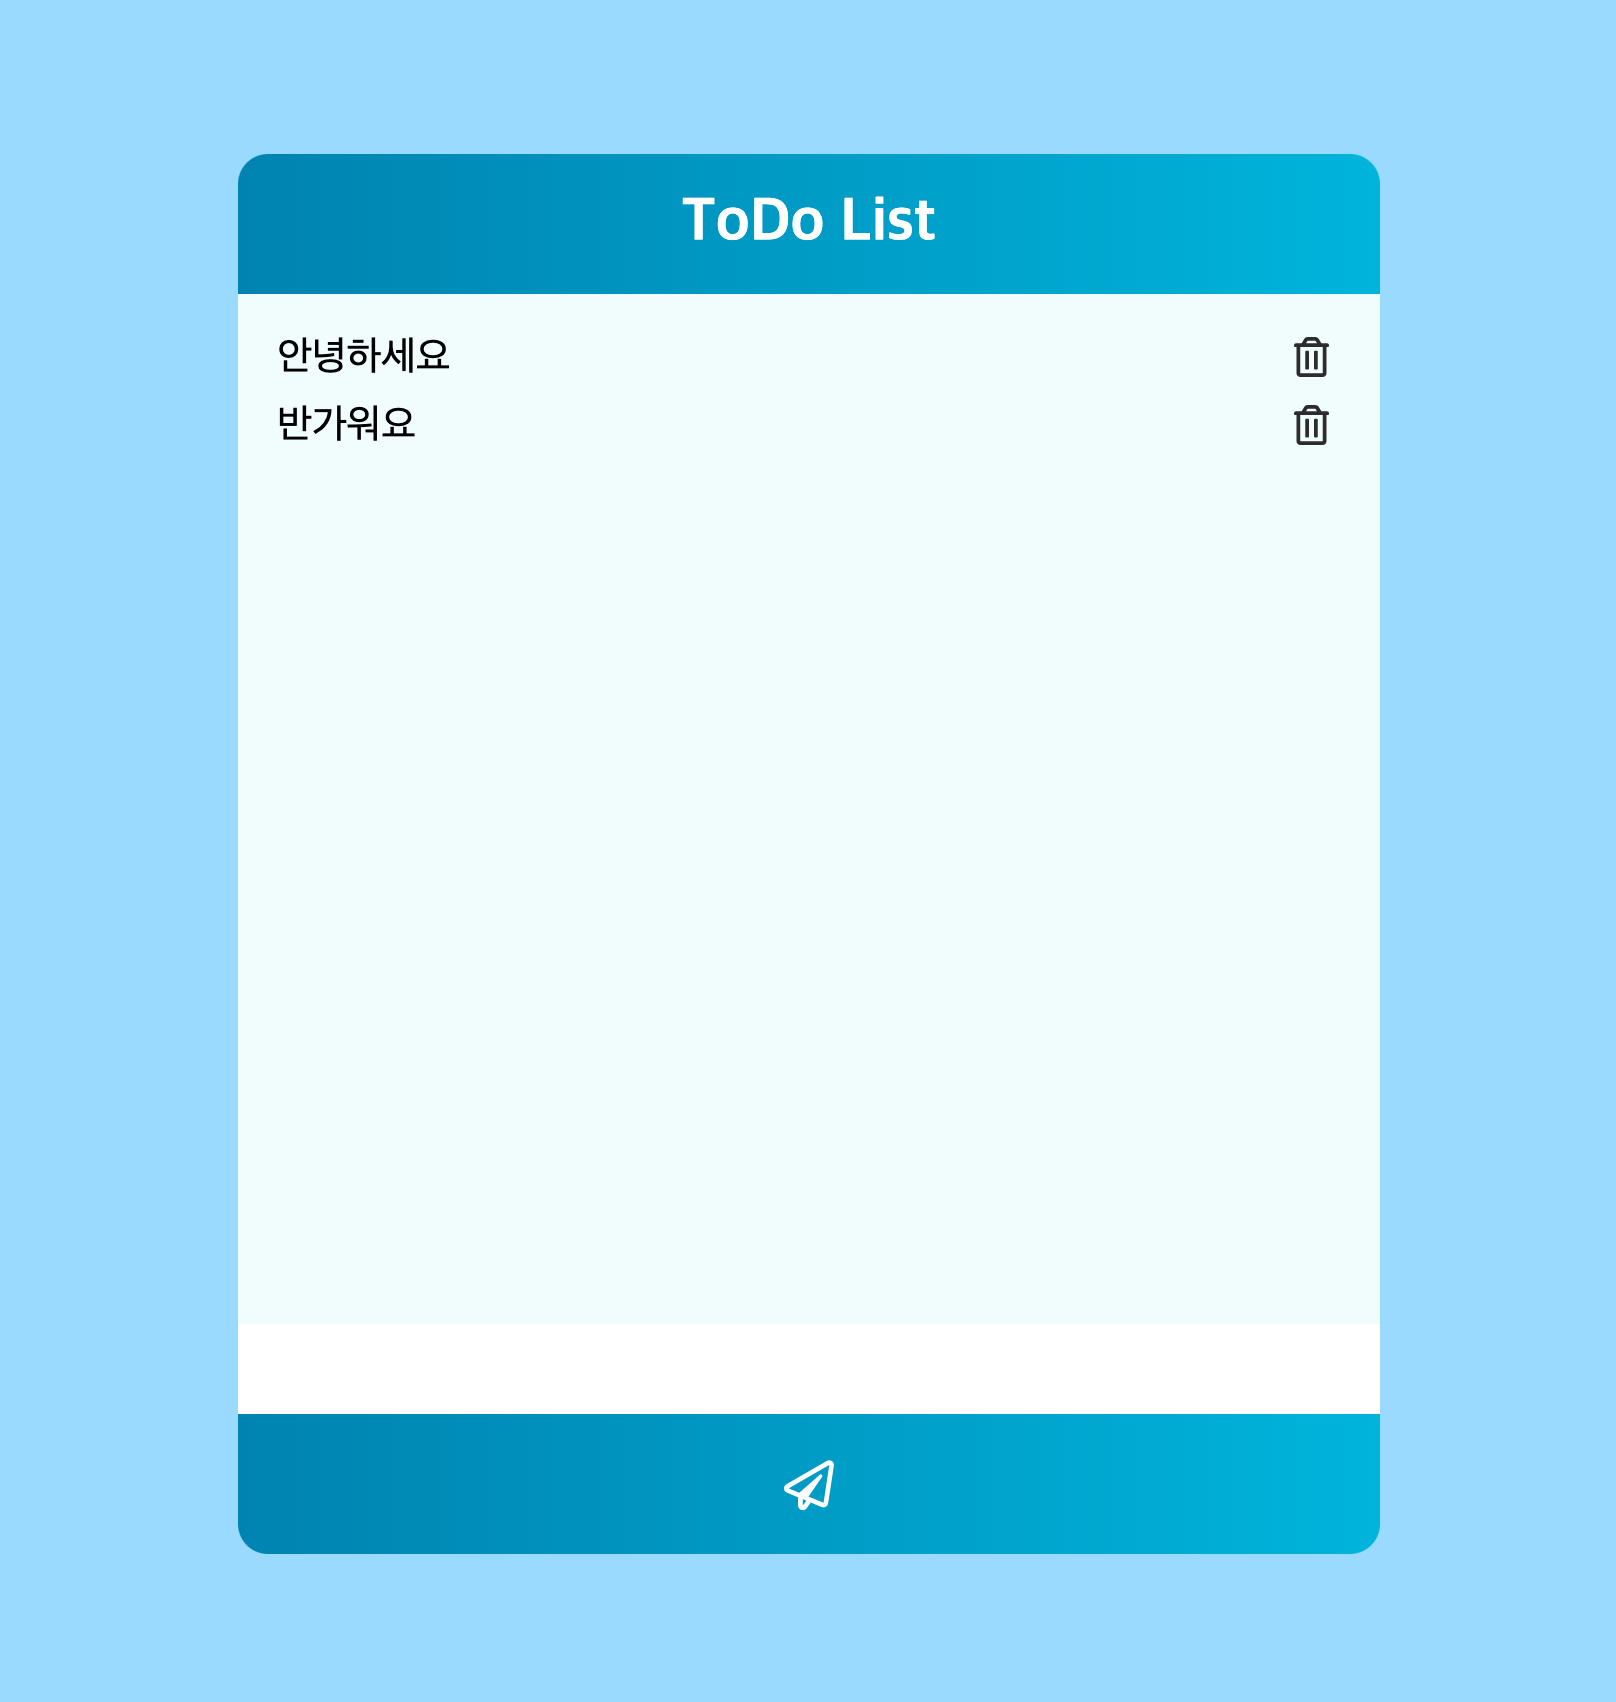
자바스크립트를 공부하면서 복습겸해서 ToDoList(할 일 목록)을 순수 자바스크립트만을 사용하여 구현해보았습니다. localStorage는 사용하지 않고 추가,삭제 기능만 간단하게 구현했습니다.
1.1 시작
우선 프로젝트를 시작하기에 앞서 fontawesome을 이용하여 icon 이미지를 사용했습니다.
HTML, CSS 부분은 자세히 설명하지 않고 넘어가겠습니다.
우선 새로운 폴더에 아래와 같이 파일들을 생성
.
|____index.html
|____index.js
|____index.css
2. ToDoList html,css 부분
2.1 index.html
<!DOCTYPE html>
<html lang="ko">
  <head>
    <meta charset="UTF-8" />
    <meta name="viewport" content="width=device-width, initial-scale=1.0" />
    <link rel="stylesheet" href="index.css" />
    <link
      rel="stylesheet"
      href="https://pro.fontawesome.com/releases/v5.10.0/css/all.css"
      integrity="sha384-AYmEC3Yw5cVb3ZcuHtOA93w35dYTsvhLPVnYs9eStHfGJvOvKxVfELGroGkvsg+p"
      crossorigin="anonymous"
    />
    <title>toDoList</title>
  </head>
  <body>
    <section class="content">
      <div class="content-header">
        <p>ToDo List</p>
      </div>
      <div class="content-body"></div>
      <div class="content-enter">
        <input type="text" id="text-input" class="text-input" />
      </div>
      <div class="content-footer">
        <button id="clickIcon">
          <i class="far fa-paper-plane"></i>
        </button>
      </div>
    </section>
    <script src="index.js"></script>
  </body>
</html>

html파일의 태그 class에 간단히 설명하자면 아래와 같습니다.
- .content : body내에서 ToDoList의 전체를 보여줄 태그
- .content-header : .content내에서의 title
- .content-body : 실질적으로 할 일 목록을 작성해서 입력하면 보여질 곳
- .content-enter : 할 일 목록을 입력할 곳
- .content-footer : 할 일을 입력한 후에 전송할 버튼
2.2 index.css
body {
  margin: 0;
  width: 100%;
  height: 100vh;
  background-color: rgb(154, 218, 255);

  display: flex;
  justify-content: center;
  align-items: center;
  box-sizing: border-box;
}

.content {
  width: 70%;
  height: 700px;
  border-radius: 15px;
}

.content-header {
  display: flex;
  justify-content: center;
  align-items: center;
  border-radius: 15px 15px 0 0;
  width: 100%;
  height: 70px;
  color: white;
  font-weight: bold;
  background: #00b4db; /* fallback for old browsers */
  background: -webkit-linear-gradient(to right, #0083b0, #00b4db); /* Chrome 10-25, Safari 5.1-6 */
  background: linear-gradient(
    to right,
    #0083b0,
    #00b4db
  ); /* W3C, IE 10+/ Edge, Firefox 16+, Chrome 26+, Opera 12+, Safari 7+ */
}
.content-header p {
  font-size: 30px;
}

.content-body {
  padding: 20px;
  width: 100%;
  height: 515px;
  display: flex;
  flex-direction: column;
  background-color: #f1fcfc;
  overflow: auto;
  box-sizing: border-box;
}

.content-body__section {
  display: flex;
  align-items: center;
  justify-content: space-between;
  margin-bottom: 10px;
  font-size: 20px;
}

.content-body button {
  background-color: transparent;
  border: 0px solid;
  color: rgb(44, 44, 44);
}
.content-body i {
  font-size: 20px;
}

.content-enter {
  width: 100%;
  height: 45px;
  margin: 0;
  padding: 0;
}
.content-enter input {
  width: 100%;
  height: 100%;
  padding-left: 15px;
  box-sizing: border-box;
  border: 0px solid;
}

.content-footer {
  display: flex;
  justify-content: center;
  align-items: center;
  border-radius: 0px 0px 15px 15px;
  width: 100%;
  height: 70px;
  color: white;
  font-weight: bold;
  background: #00b4db; /* fallback for old browsers */
  background: -webkit-linear-gradient(to right, #0083b0, #00b4db); /* Chrome 10-25, Safari 5.1-6 */
  background: linear-gradient(
    to right,
    #0083b0,
    #00b4db
  ); /* W3C, IE 10+/ Edge, Firefox 16+, Chrome 26+, Opera 12+, Safari 7+ */
}

.content-footer button {
  background-color: transparent;
  border: 0px solid;
  color: white;
}

.content-footer i {
  font-size: 25px;
}
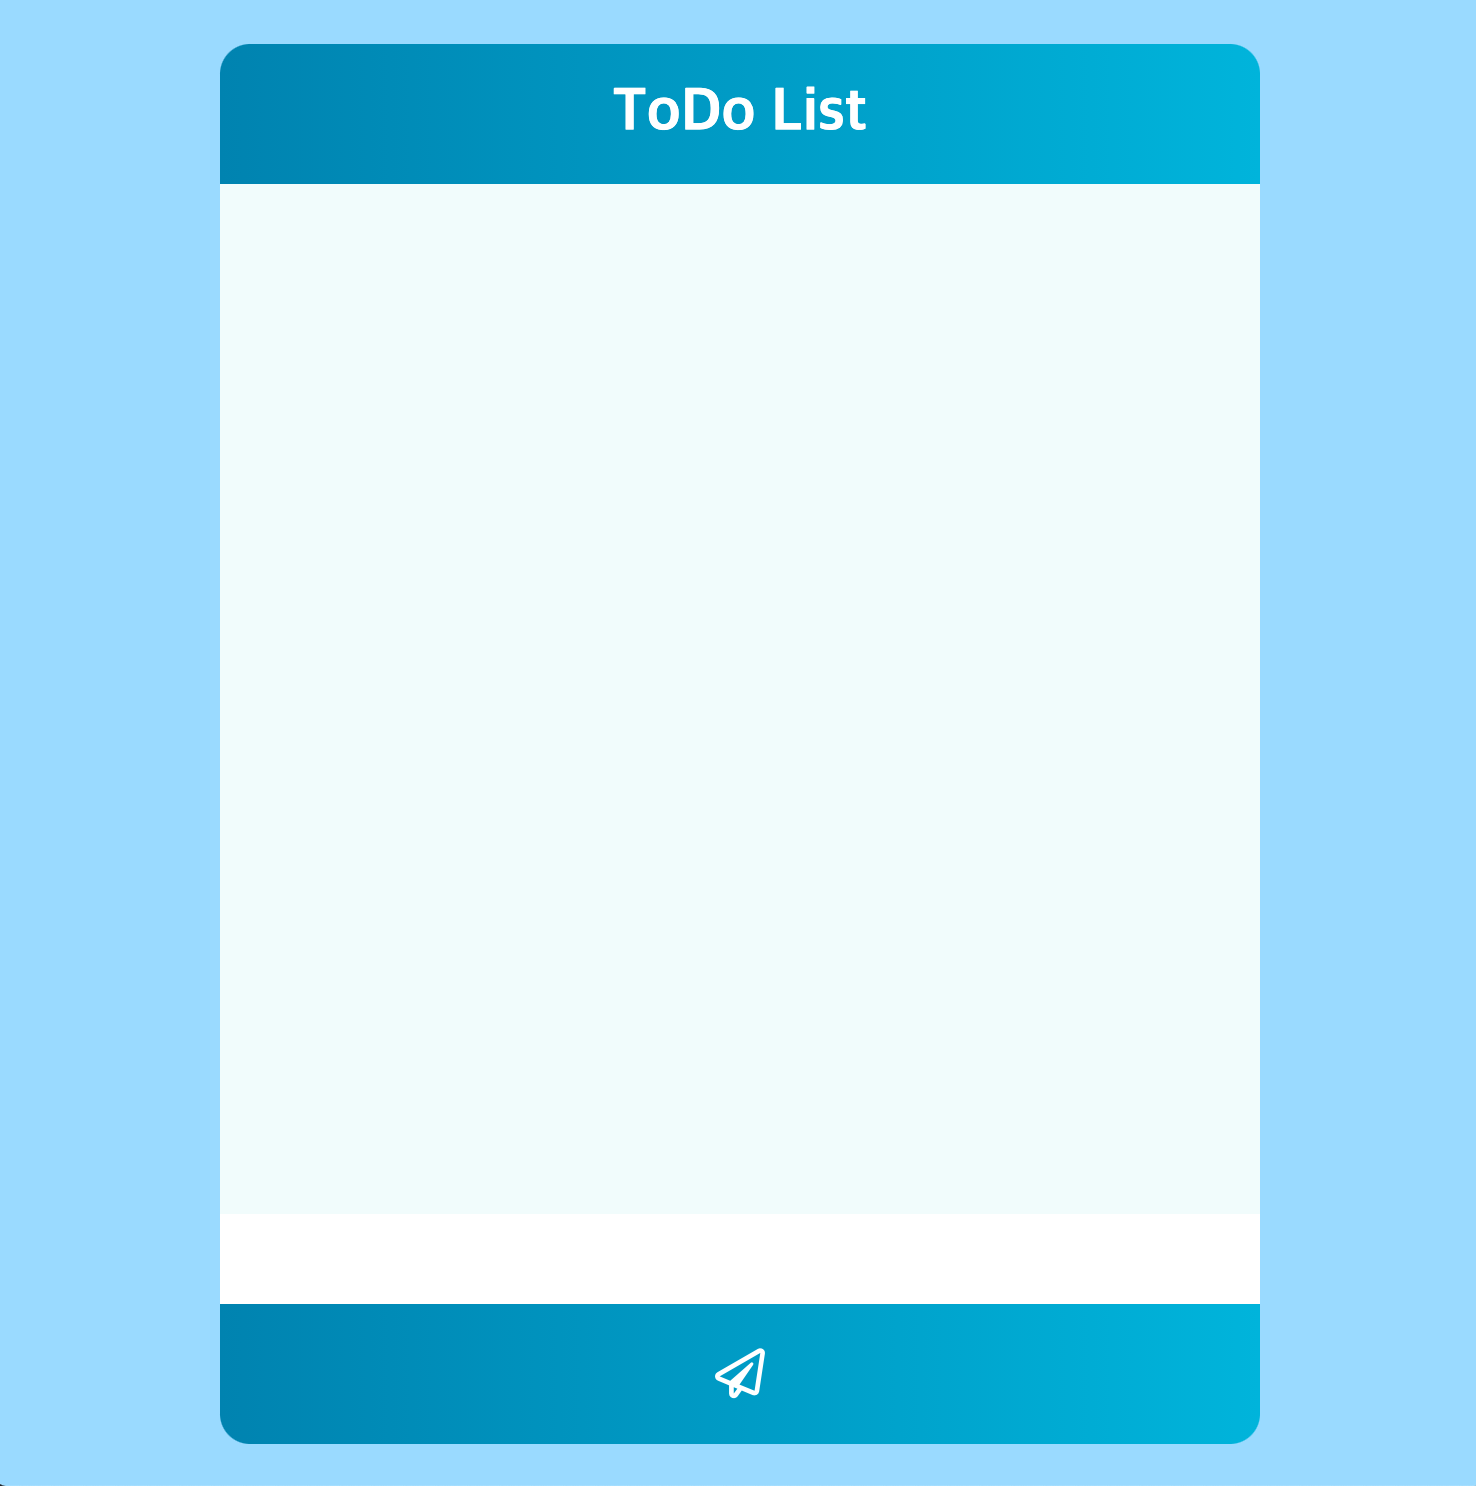
CSS를 적용 조금 많이 부족한 디자인이지만 없는 것보다는 괜찮은 화면이 보여집니다.😅
3. ToDoList javascript 부분
3.1 index.js

이제 여기서 입력창에 텍스트를 넣고 입력한 텍스트를 받아오는 코드를 작성합시다.
const input = document.getElementById('text-input');
const button = document.getElementById('clickIcon');
button.addEventListener('click', inputText);

input.addEventListener('keydown', (event) => {
  if (event.keyCode === 13) {
    inputText();
  }
});
이와 같이 input 변수를 생성해서 element를 가져옵니다. 마찬가지로 button 변수를 생성 element를 받아오고 입력된 값을 클릭 했을시 발생하는 이벤트리스너를 작성합니다. 여기서 event.keyCode는 평상시에 우리가 무언가 입력할 때 엔터키를 자주이용하기 때문에 keydown 이벤트를 사용하여 keyCode === 13(enter) 값일때 이벤트가 발생하도록 했습니다.
이제 여기서 이벤트발생시 실행되는 함수 inputText를 작성하도록 하겠습니다.
inputText
const inputText = () => {
  console.log(input.value);
}
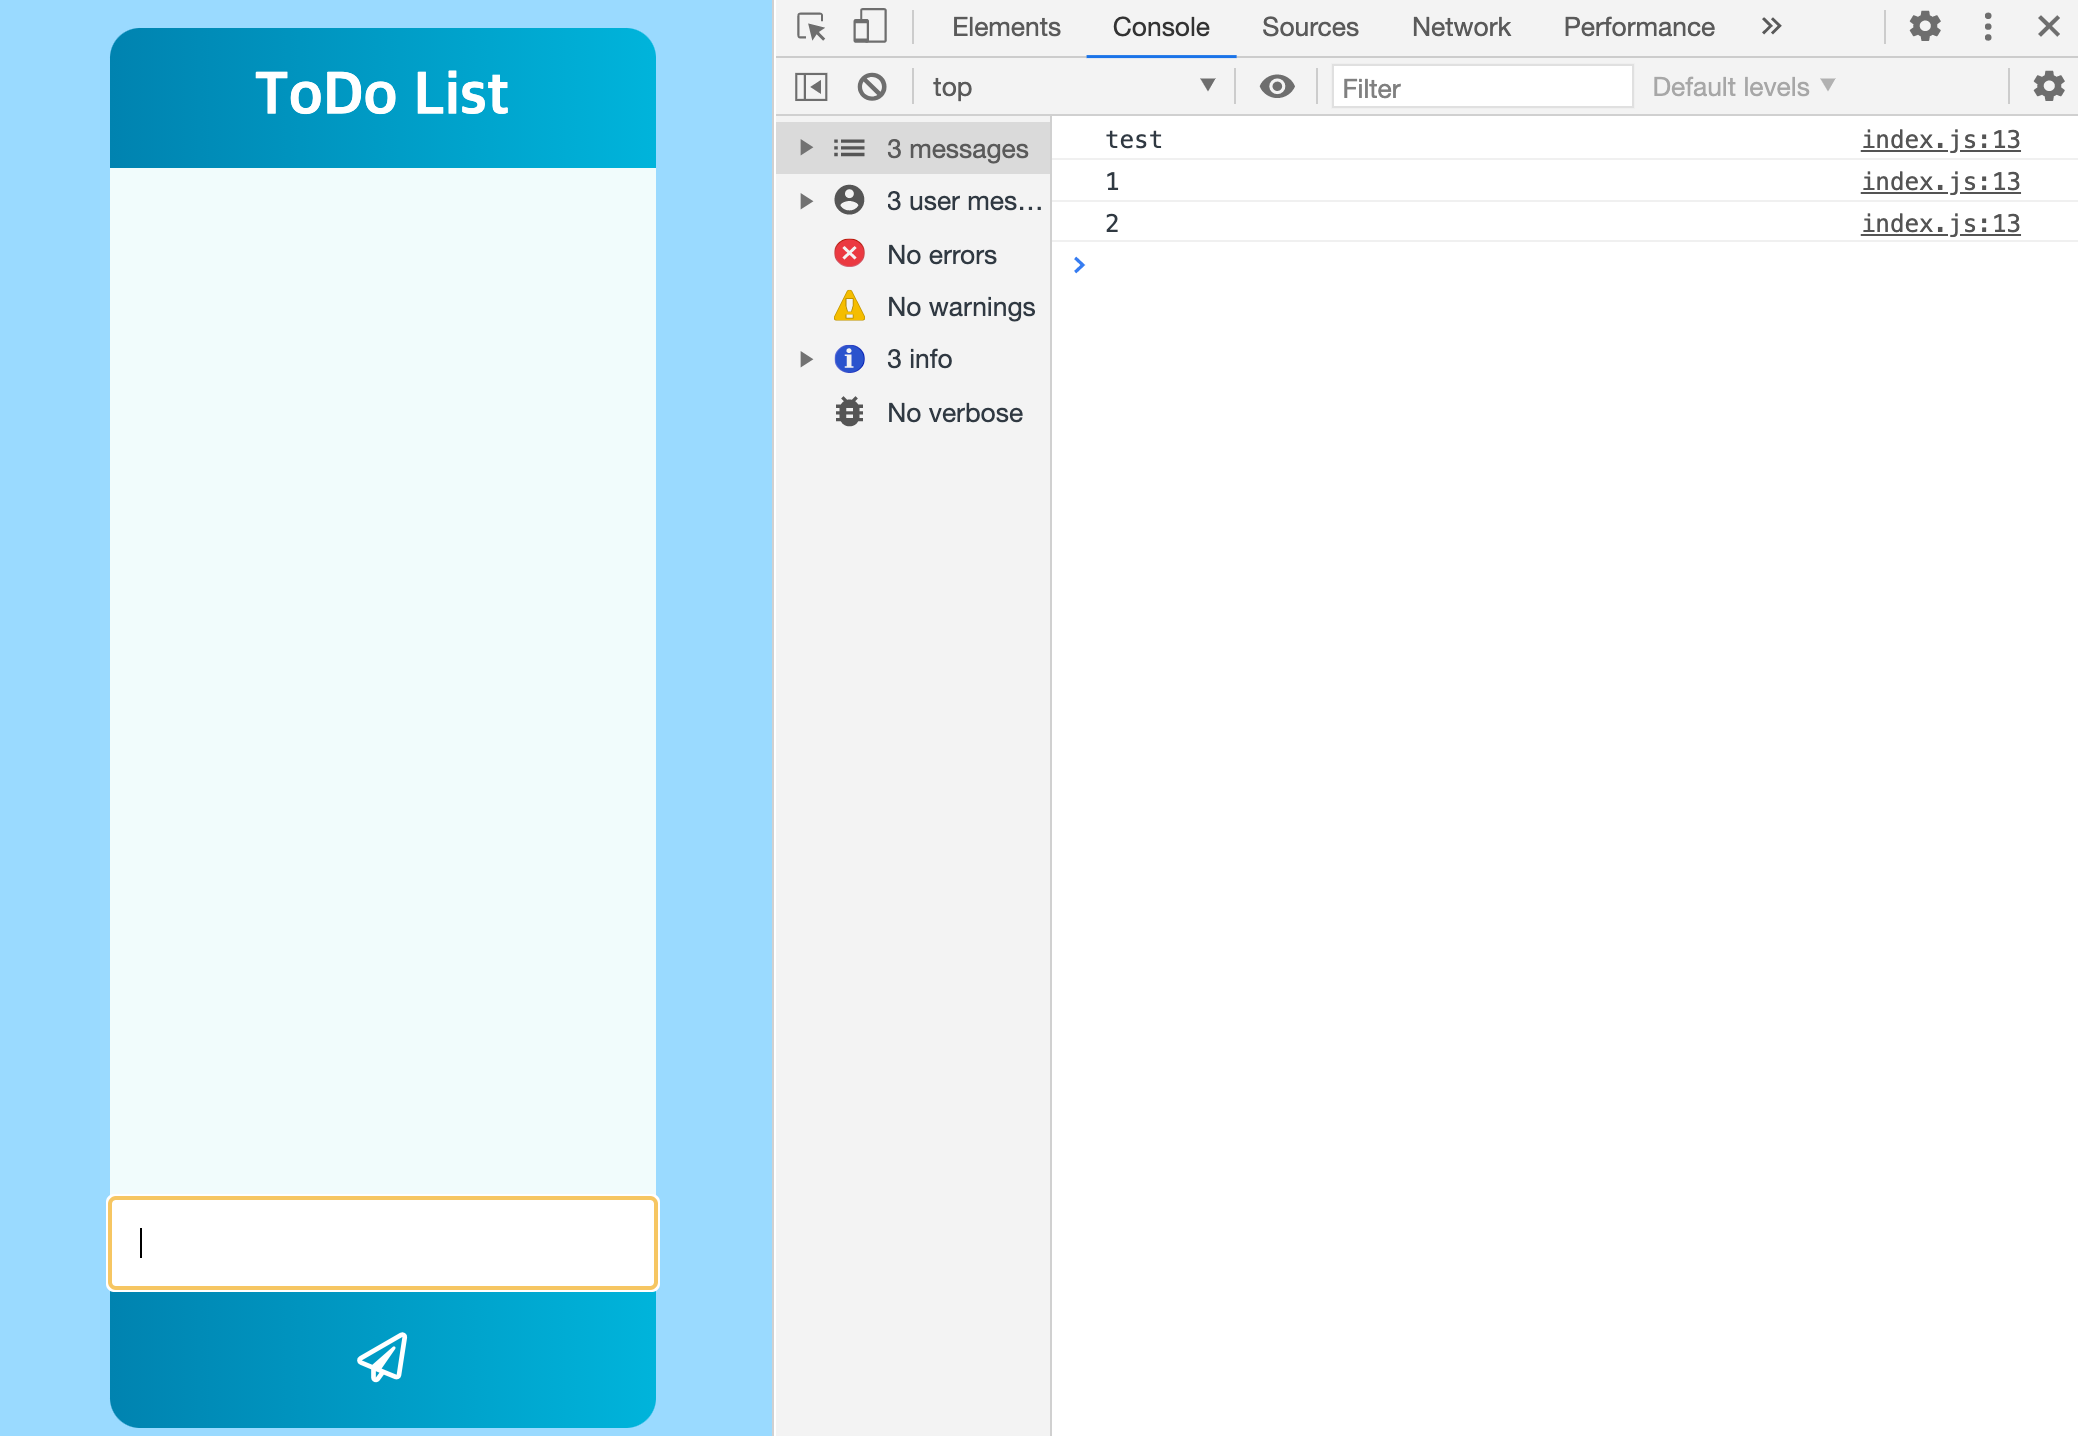
우선 위와같이 console.log()를 사용해서 우리가 입력한 text값이 넘어오는지 확인할 수 있습니다.
전송버튼인 icon을 클릭하던가, enter키를 입력했을 시에 콘솔창에 이상없이 값이 찍히면 됩니다.
이제 값이 넘어오는 것을 확인했으니 받아온 text값을 DOM을 조작하여 화면에 표시하도록 하겠습니다.
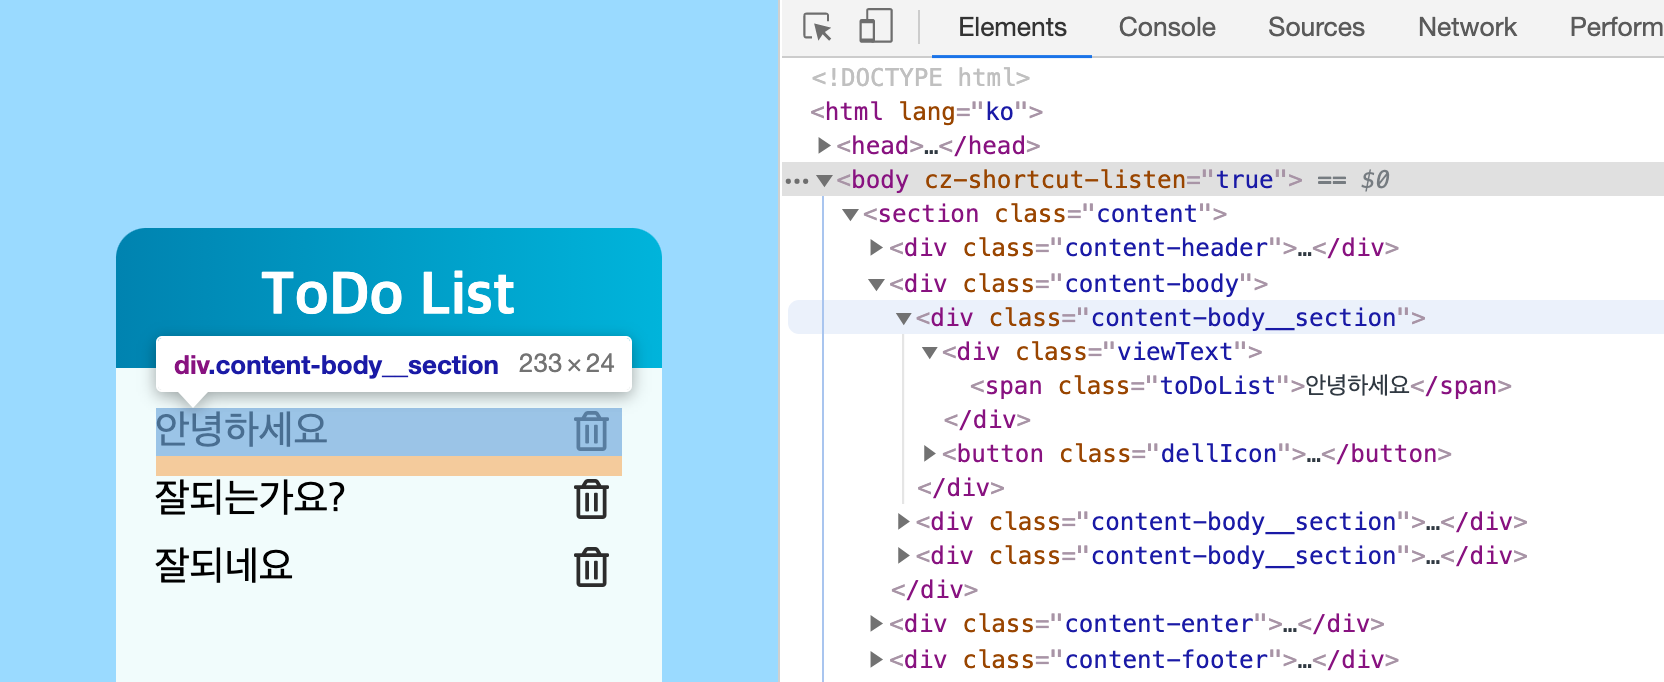
우선 코드를 작성하기에 앞서 위와 같은 구조로 요소들이 추가되도록 할 것 입니다.
(전 조금은 다르게도 만들어보고 싶어서 ul li 태그를 사용하지 않았지만 ul li 이용하여 만드는게 더 좋습니다!)
const contentBody = document.querySelector('.content-body');

const inputText = () => {
  const bodySection = document.createElement('div');
  const viewText = document.createElement('div');
  const dellIcon = document.createElement('button');
  bodySection.className = 'content-body__section';
  viewText.className = 'viewText';
  dellIcon.className = 'dellIcon';

  contentBody.appendChild(bodySection);

  bodySection.appendChild(viewText);
  bodySection.appendChild(dellIcon);

  const span = document.createElement('span');
  const i = document.createElement('i');
  const text = input.value;

  span.className = 'toDoList';
  span.textContent = text;
  i.className = 'far fa-trash-alt';

  viewText.appendChild(span);
  dellIcon.appendChild(i);

  input.value = '';
};
element.className은 css를 적용하기 위해 설정한 것
const contentBody: 각각의 요소들이 추가되면 최종적으로 content-body 자식으로 요소들이 추가됨const bodySection: 입력된 text와 삭제 icon을 묶어줄 부모div태그 생성const viewText: bodySection 자식 요소로서 입력된 text값을 받아와 화면에 보여줄div태그 생성const dellIcon: bodySection 자식 요소로서 클릭시 해당 text를 삭제할button태그 생성
contentBody.appendChild(bodySection): 최종적으로 contentBody 부모요소 아래에 요소들이 추가 되기 때문에appendChild()를 사용하여 자식요소로 bodySection 추가bodySection.appendChild(viewText): bodySection 자식 요소로 추가bodySection.appendChild(dellIcon): bodySection 자식 요소로 추가
const span: 입력된 text값을 넣을span태그 생성const i: 삭제 icon을 넣을i태그 생성const text: input에 입력된 text 값을 받아와 저장할 변수span.textContent: 입력된 값을 화면에 보여주기 위해 span 태그에 text 값을 추가viewText.appendChild(span): span 저장된 요소들을 viewText의 자식요소로 추가dellIcon.appendChild(i): 아이콘을 dellIcon의 자식요소로 추가
결국은 입력된 text값을 받아오는 것 이외에 css에 작성한 코드대로 화면에 보여지기위해 요소들을 추가하는게 더 복잡해보이는..
이제 추가 기능은 다 만들었으니 삭제도 해보도록 하겠습니다. 삭제는 완전 간단합니다.
const deleteToDo = (event) => {
  const remove = event.target.parentNode.parentNode;
  contentBody.removeChild(remove);
};

const inputText = () => {
  ...
  ...
  viewText.appendChild(span);
  dellIcon.appendChild(i);

  dellIcon.addEventListener('click', deleteToDo);
  input.value = '';
}
dellIcon이라는 요소를 만들었는데 거기에 대한 클릭 이벤트리스너를 등록해주고 함수를 작성하면 됩니다!
그리고 removeChild를 사용해서 해당하는 자식요소를 부모요소에서 제거해버리면 됩니다!
const remove = event.target.parentNode.parentNode;
이부분이 의아하실텐데 우선 아래를 봐봅시다.
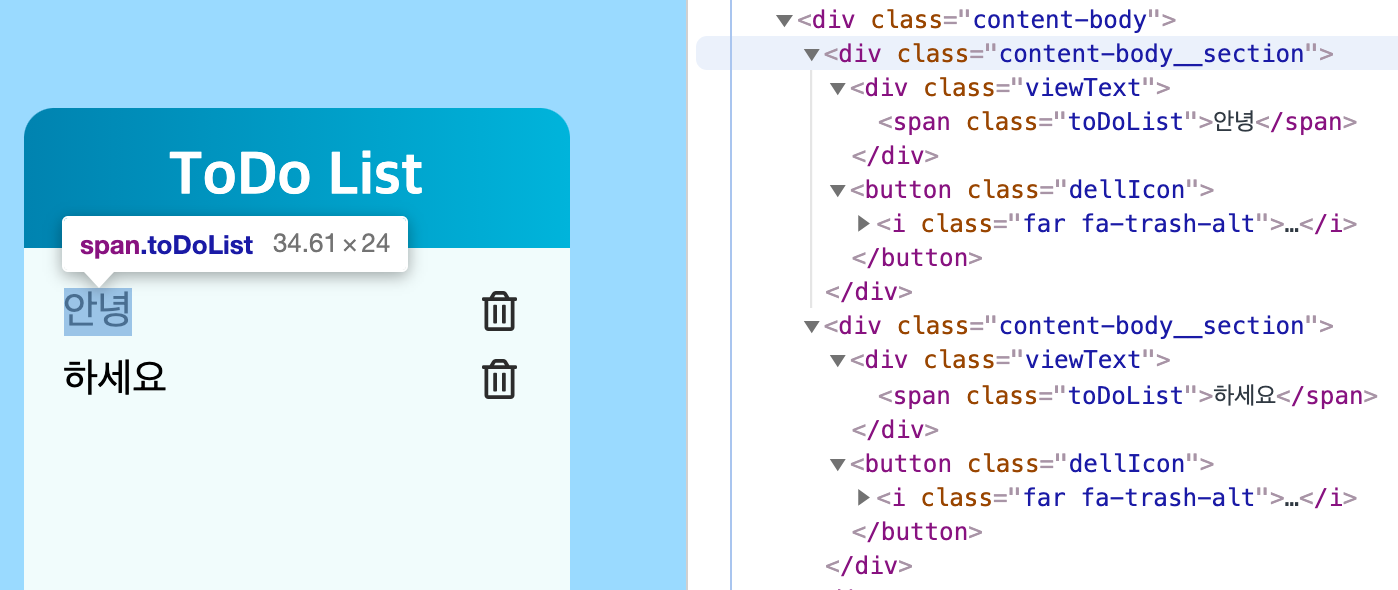
만약 “안녕” 이라는 목록을 삭제하려면 우리는 <div class="content-body__section"> ... <div> 이부분을 없애면 됩니다. 어떻게 없앨까요??
우선 저희는 dellIcon.addEventListener('click', deleteToDo);를 통해 목록마다 클릭 이벤트리스너를 등록했습니다. 즉 우리는 클릭한 요소를 가져올 수 있습니다.
조금더 이해하기 편하게 “안녕” 이라는 목록을 삭제했다하고 console.log()를 찍어보도록 하겠습니다.
const deleteToDo = (event) => {
  console.log(event.target);
  console.log(event.target.parentNode);
  console.log(event.target.parentNode.parentNode);
};

처음 event.target을 했을 경우 저희는 삭제 아이콘을 클릭 했기 때문에 <i class>...</i> 요소를 가져옵니다.
parentNode를 했을 경우에는 i태그의 부모인 <button class="dellIcon">...</button> 요소까지 가져옵니다.
parentNode.parentNode를 했을 경우에는 button 태그의 부모인 <div class="content-body__section">...</div> 요소까지 가져오는 것을 확인할 수 있습니다.
3.2 최종 index.js 코드
const input = document.getElementById('text-input');
const button = document.getElementById('clickIcon');

// get element
const contentBody = document.querySelector('.content-body');

const deleteToDo = (event) => {
  const remove = event.target.parentNode.parentNode;
  contentBody.removeChild(remove);
};

const inputText = () => {
  const bodySection = document.createElement('div');
  const viewText = document.createElement('div');
  const dellIcon = document.createElement('button');
  const span = document.createElement('span');
  const i = document.createElement('i');
  const text = input.value;

  bodySection.className = 'content-body__section';
  viewText.className = 'viewText';
  dellIcon.className = 'dellIcon';

  contentBody.appendChild(bodySection);
  bodySection.appendChild(viewText);
  bodySection.appendChild(dellIcon);

  span.className = 'toDoList';
  span.textContent = text;
  i.className = 'far fa-trash-alt';

  viewText.appendChild(span);
  dellIcon.appendChild(i);

  dellIcon.addEventListener('click', deleteToDo);
  input.value = '';
};

button.addEventListener('click', inputText);
input.addEventListener('keydown', (event) => {
  if (event.keyCode === 13) {
    inputText();
  }
});
참고
댓글남기기